If you’ve already had the chance to look through the book, Pattern Magic, you might find that a lot of the designs might not appear to be very wearable, as amazing as they are. I found that this exercise from the book was something closest to what I would actually wear in everyday life. This project was my very first attempt at using the Pattern Magic as a guide to hack a pattern I had in my stash. I’ll outline all the steps so you can achieve the same look!
The Details
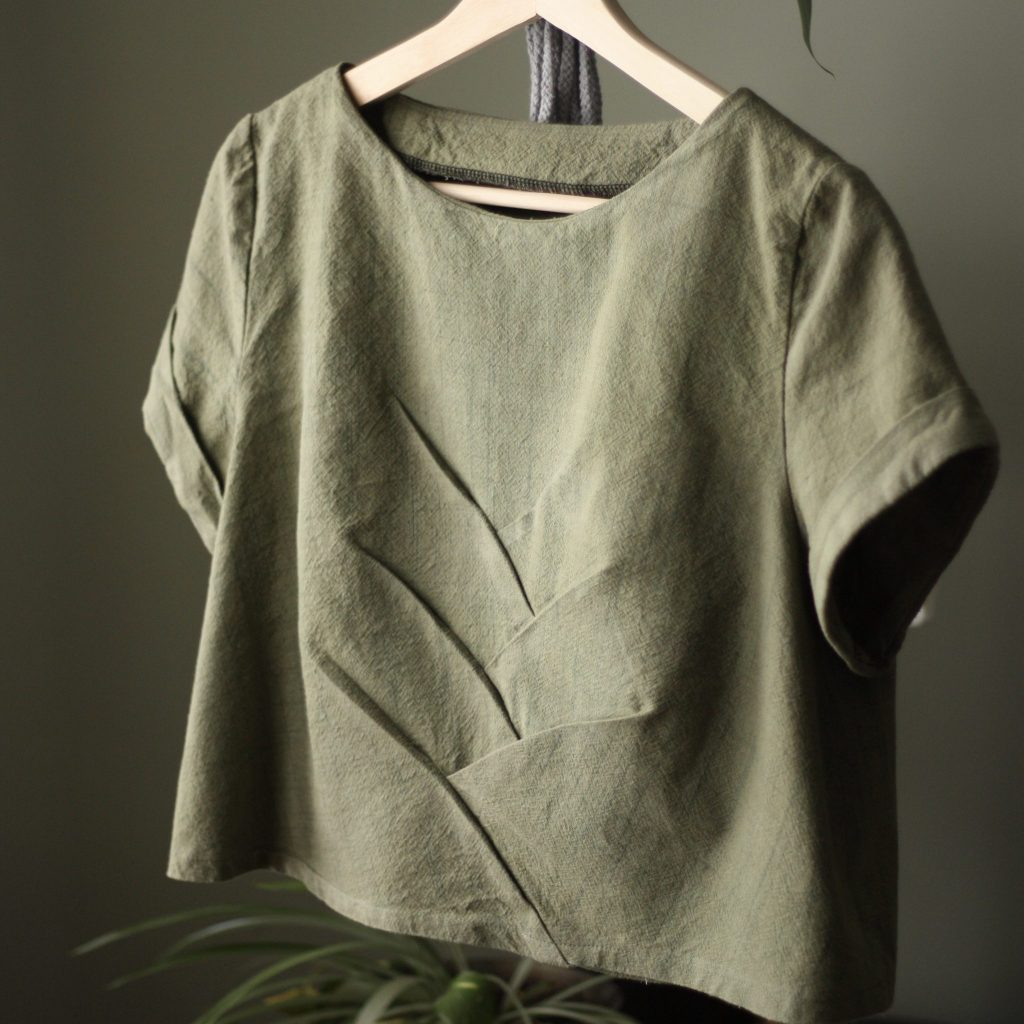
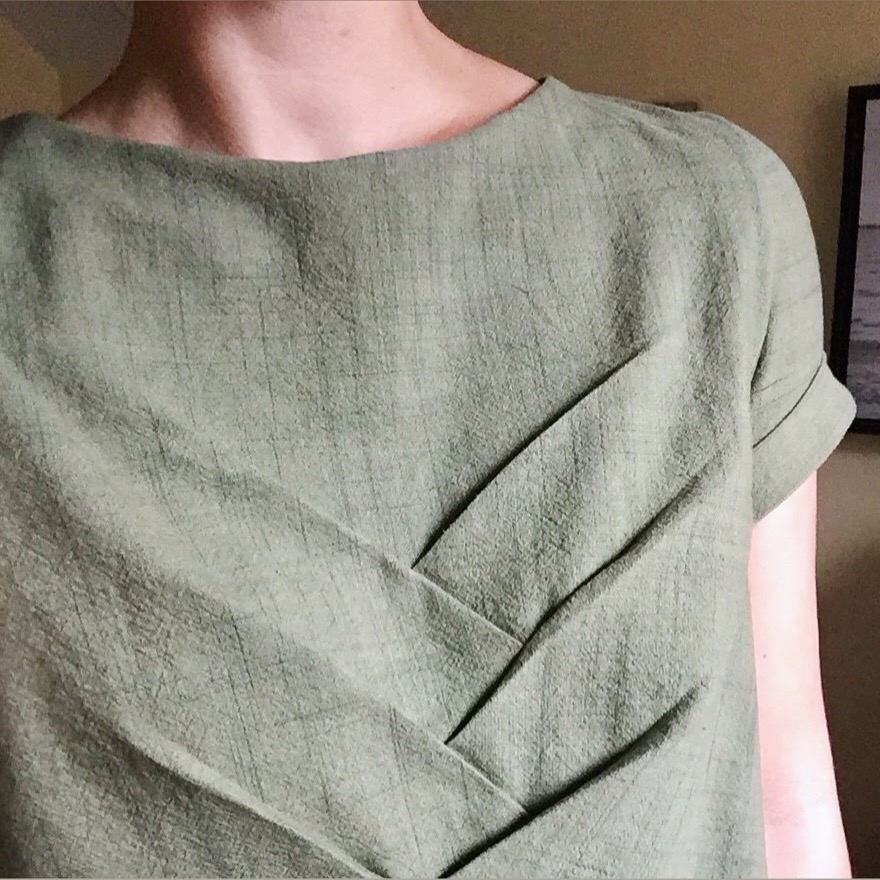
- Pattern is Inari Tee Dress from Named Clothing
- I used the cropped tee view in size 6, which matches my measurements (36″ bust, “29 waist)
- Book is called Pattern Magic by Tomoko Nagamichi, Bamboo Shoot project p. 84
- Fabric is hand-dyed, hand woven cotton from northern Thailand
- Useful materials include tracing paper (I buy the big roll) and erasable pens in different colors (I love these – I use them on fabric and they disappear under an iron).
If you are interested in more projects from the Pattern Magic book, check out how I drafted a woven braided top version of the Ogden Cami.
Use the following photo galleries to follow along with the numbered steps outlined below. Treat this like a little sew-along, but give yourself as much time and tea refills as you need. Let’s boogie.
Preparing the Front Bodice Pattern Piece
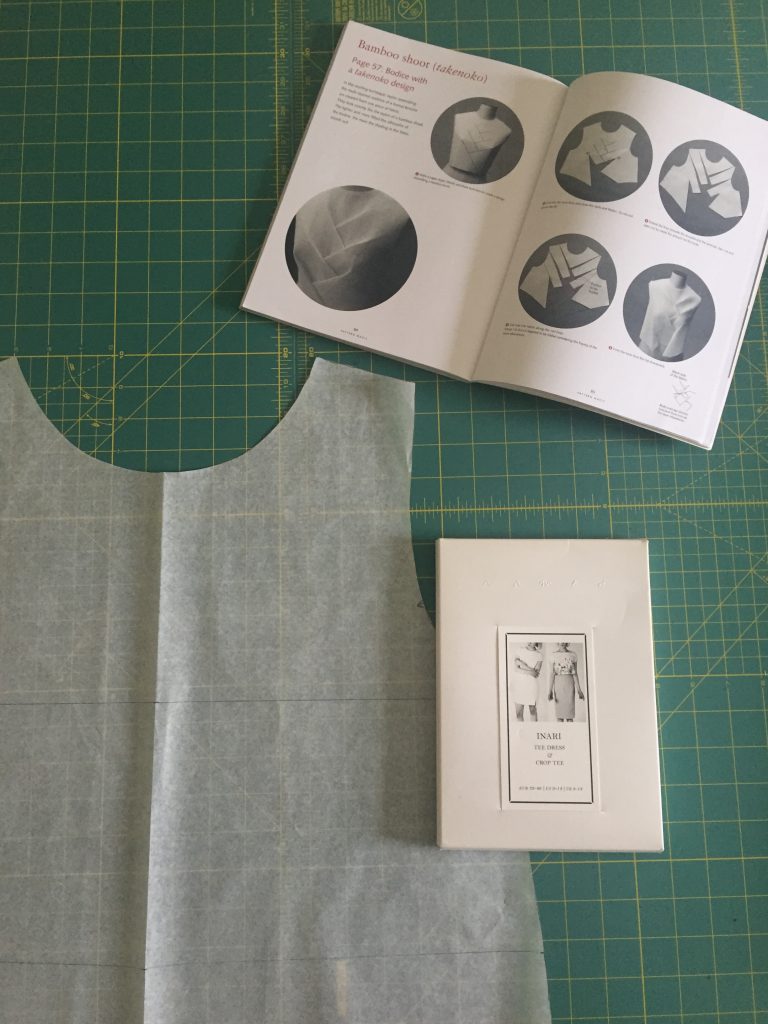
Pattern Magic Book + Inari Tee Pattern by Named 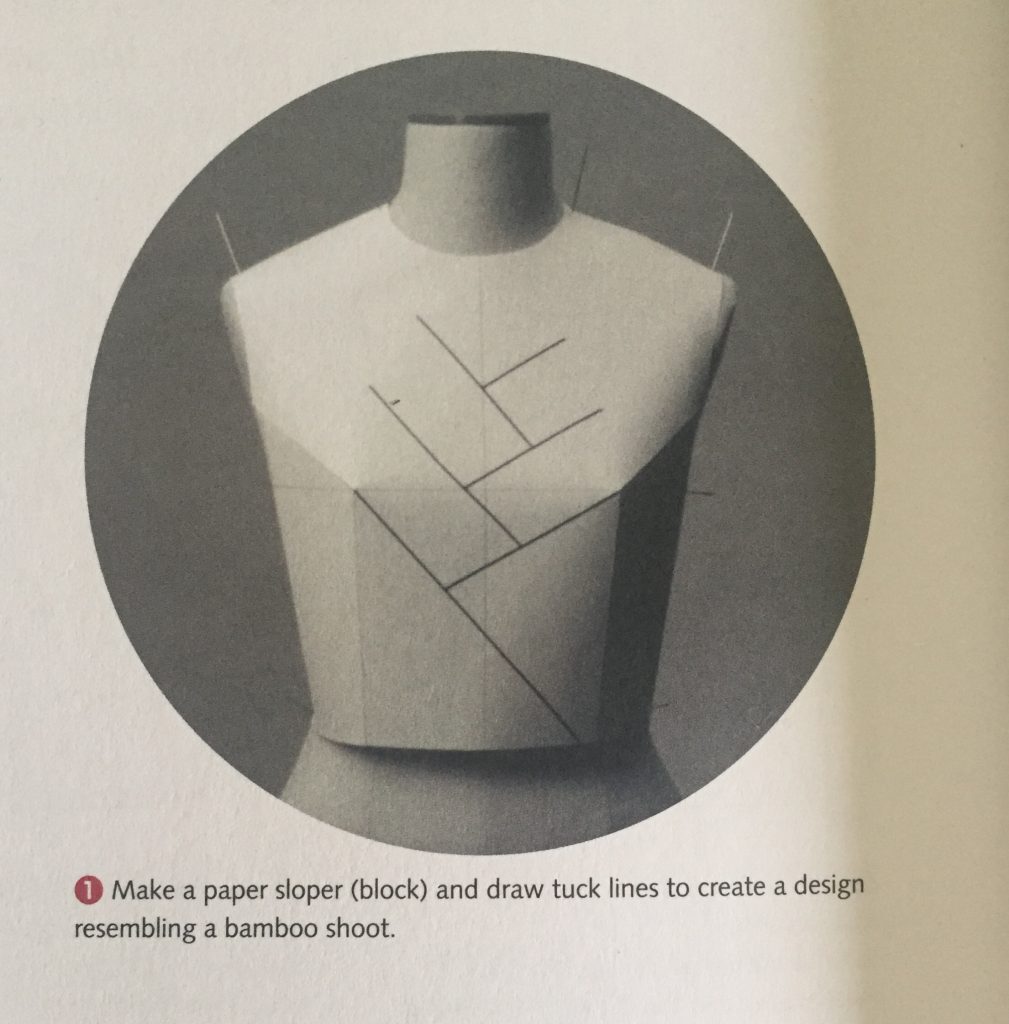
Step 1 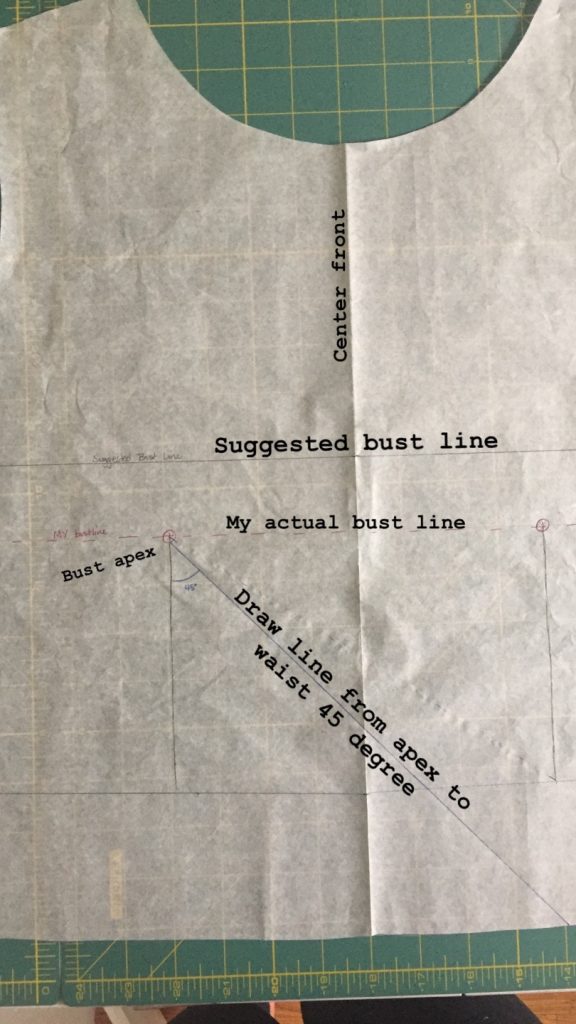
Step 2 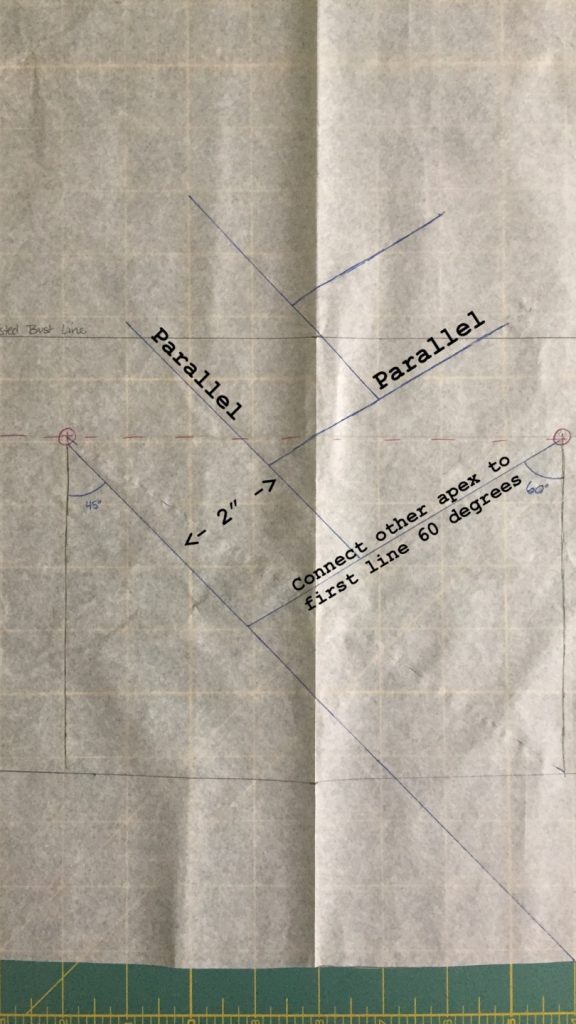
Step 3 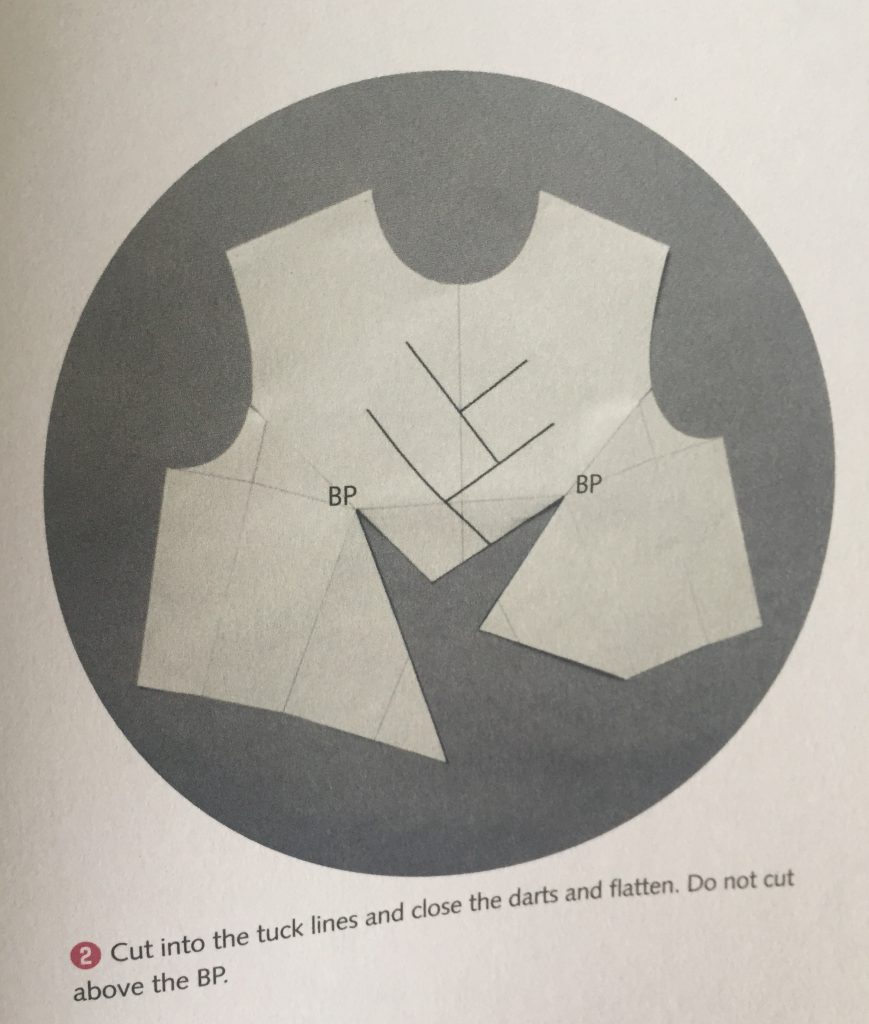
Step 4 
Step 5
- Alright, are you ready? You should have tracing paper, pens, a ruler, your Inari Pattern (or top pattern of your choice) and your Pattern Magic book handy. Start by tracing your front bodice piece onto one piece of paper and transfer notches and markings.
- Step 1: Read through the whole Bamboo Shoot bodice project now, so you know what you’re working towards in the following steps. It might not all make sense at first, but we will take it a step at a time.
- 2: Mark a vertical line at center front, mark the pattern’s suggested waistline and bust line. Turns out my bust line is lower than what’s suggested (is this what maturity feels like?) so I marked my actual bust line as you can see in the photo. Hold the tissue up to your body, carefully placing the shoulder seams at the top of your shoulder and mark your bust apex/points (the fullest part of your bust, probably close to where your nipples are). Draw lines from the bust points down to the waistline. As you look at the pattern, draw a line from the bust apex on the left down to the waistline at a 45 degree angle.
- 3: Draw a line from the right bust apex down to your diagonal line at a 60 degree angle. I’m sure the angles don’t need to be this precise, but I found my quilting ruler was useful for this, and I just chose angles that looked really similar to the book’s example. Draw alternating parallel lines working your way up the bodice, each 2″ higher than the last. You will have 3 parallel lines on each side, and the length of the lines doesn’t matter at this point because we will be extending them in a later step.
- 4: Review the next step’s instructions in the book and grab your scissors.
- 5: Cut the first two diagonal lines that you drew, the ones that connect to the bust points. Gently spread the pieces apart and in order for the pattern piece to lay flat, you will have to fold some temporary darts between the bust point and the arm holes.
Preparing the Front Bodice Pattern Piece Continued
Step 6 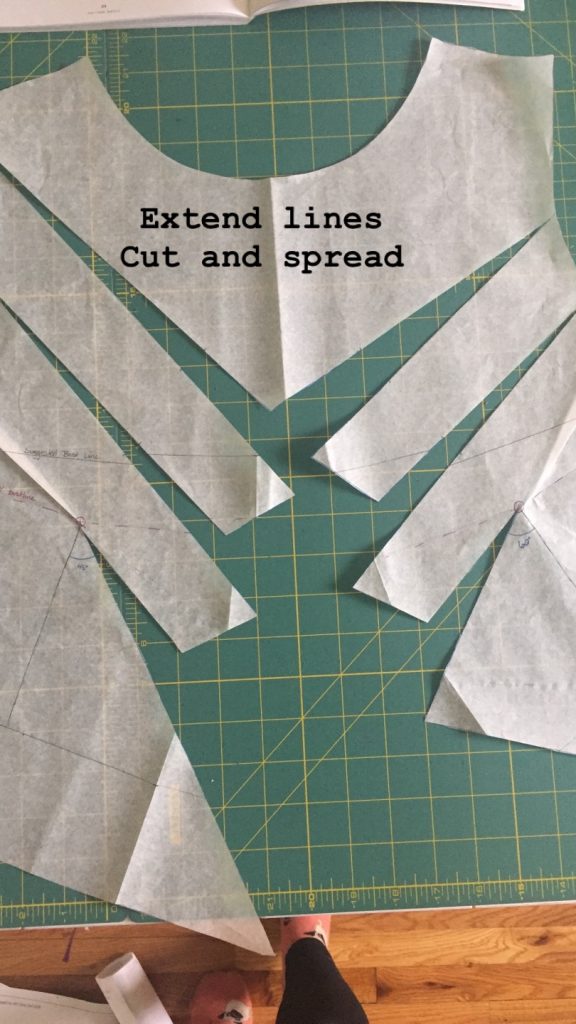
Step 7 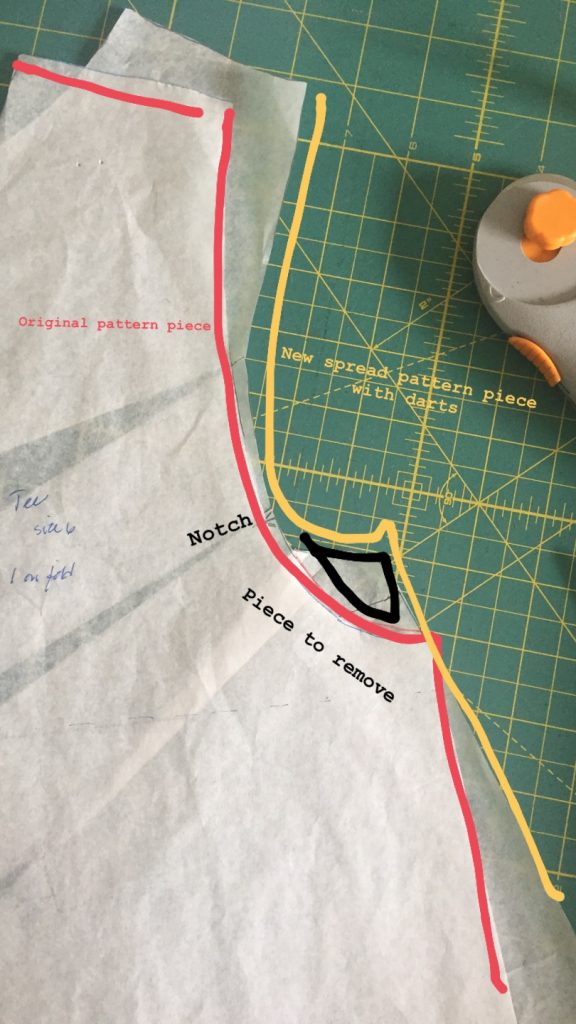
Step 8 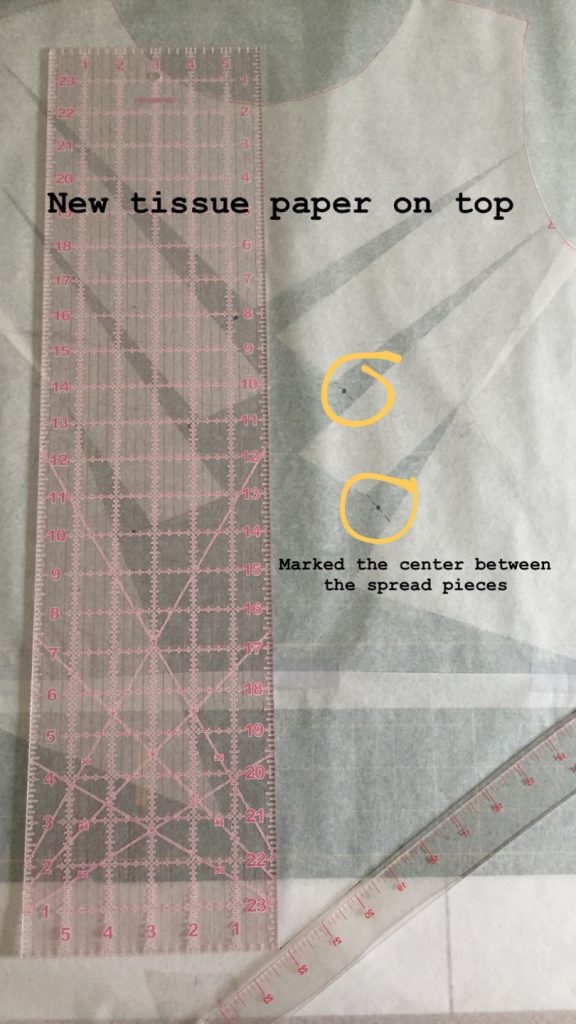
Step 9 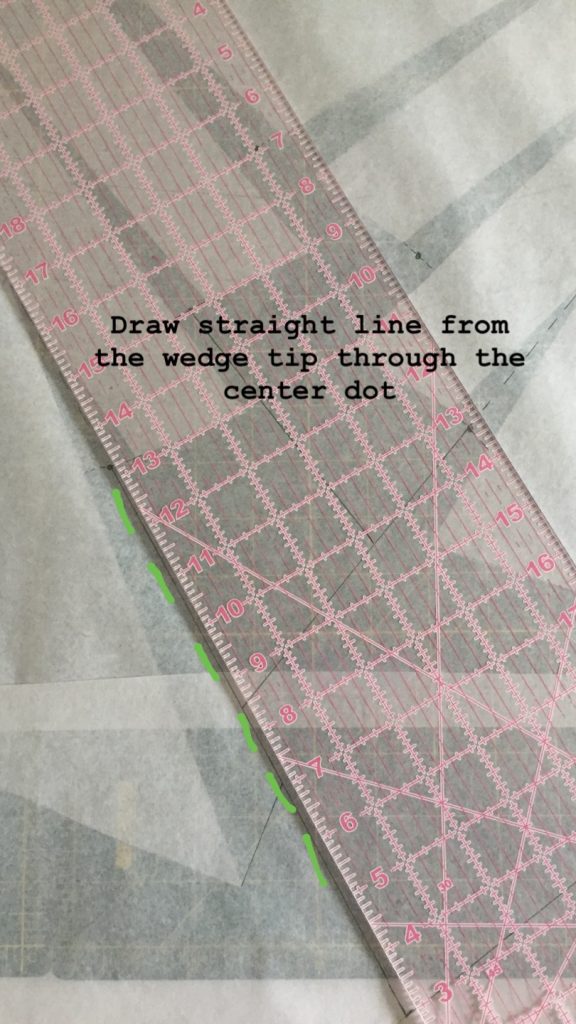
Step 10 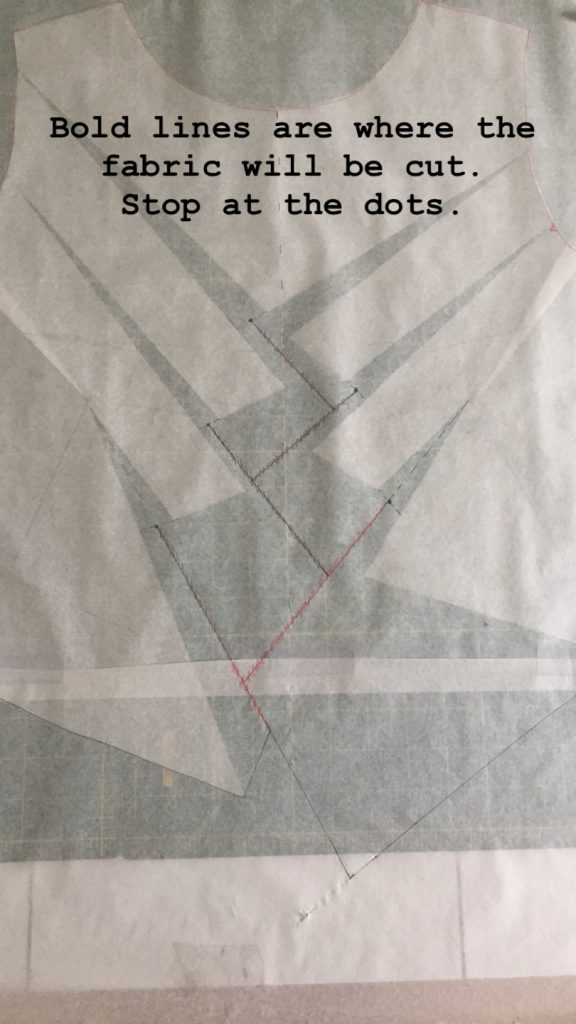
Step 11
- 6: Check out what’s happening next in the Pattern Magic book’s instructions.
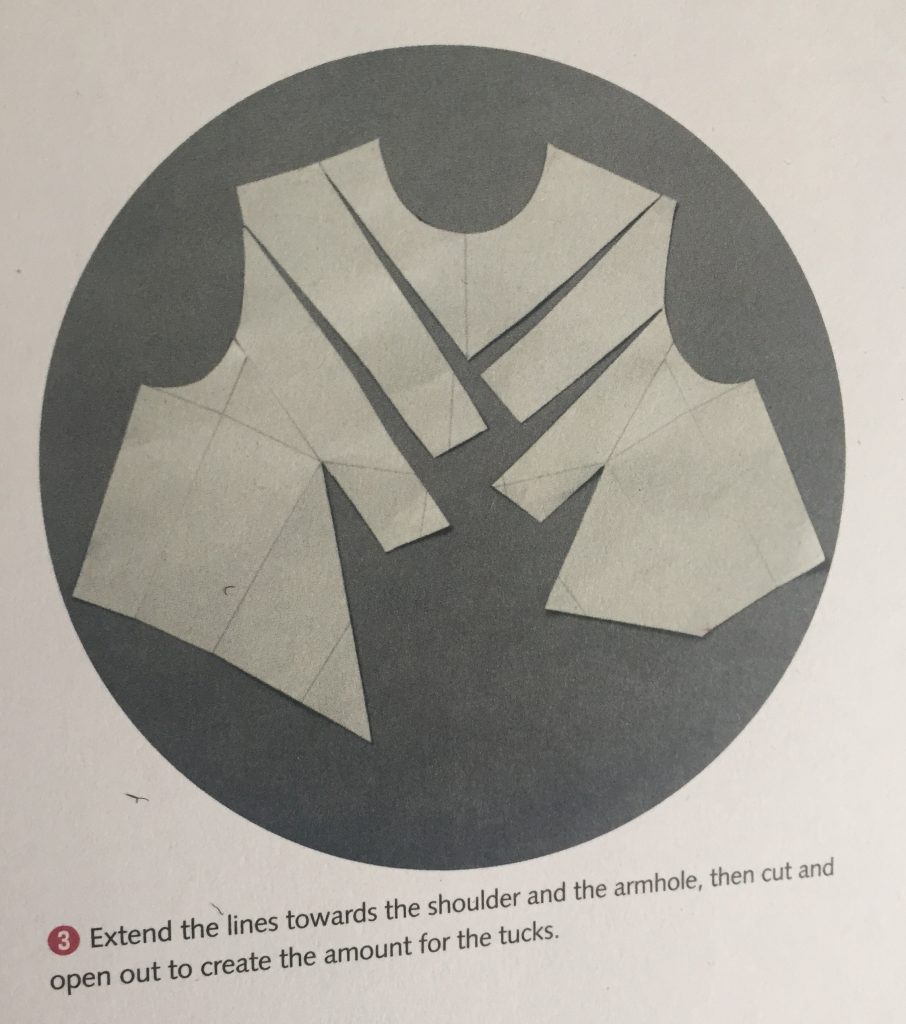
- 7: Extend the lines (not the lines you’ve already cut, just the ones above) all the way to the armholes or shoulders. Next, cut along those extended lines up to but not through the edge of the pattern piece. Gently spread the pieces apart and feel free to tape them down to the table if you like.
- 8: When you spread the bodice apart, you’ll see you change the shape of the armscye edge. Here’s what I did: I put the original Inari front piece over the top of the spread piece, matching at the notches, and I removed the excess from the spread piece between the notch and the side seam. See my rough picture above where I removed the little part outlined in black. Ultimately, I wanted to mimic the curve of the armhole of the original pattern as best as I could.
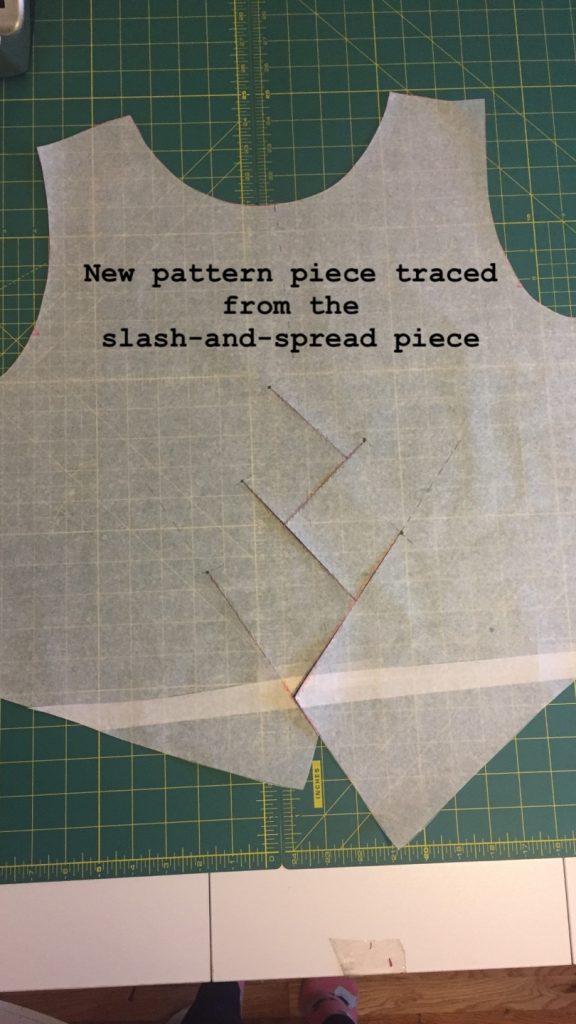
- 9: Put a fresh sheet of tracing paper over your slashed and spread bodice. Mark a dot right at the center of the widest part of the spread wedge. Repeat for all six wedges.
- 10: Using your ruler or a straight edge, draw a straight line from the narrow tip of the wedge through the dot you drew in step 9. Repeat for all six wedges.
- 11: Use a new color or boldly mark where you will cut: the space from the dot you drew in step 9 to the next line it intersects with (or to the waistline in the case of the lowest wedge). See image in the gallery or use your book for reference.
Preparing and Sewing the Front Bodice
Step 12 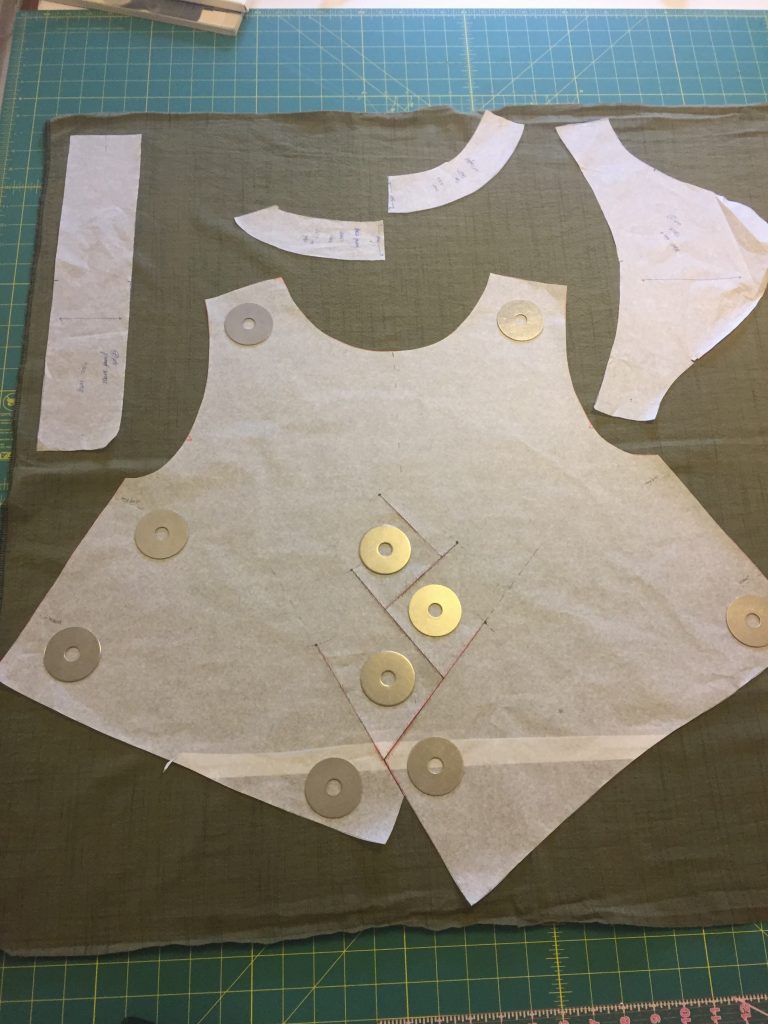
Step 13 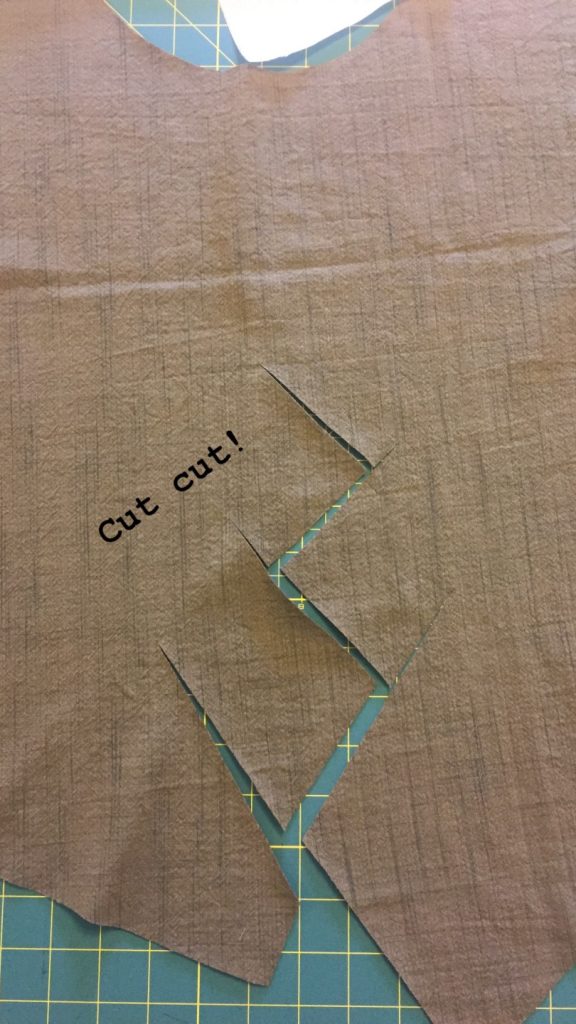
Step 14 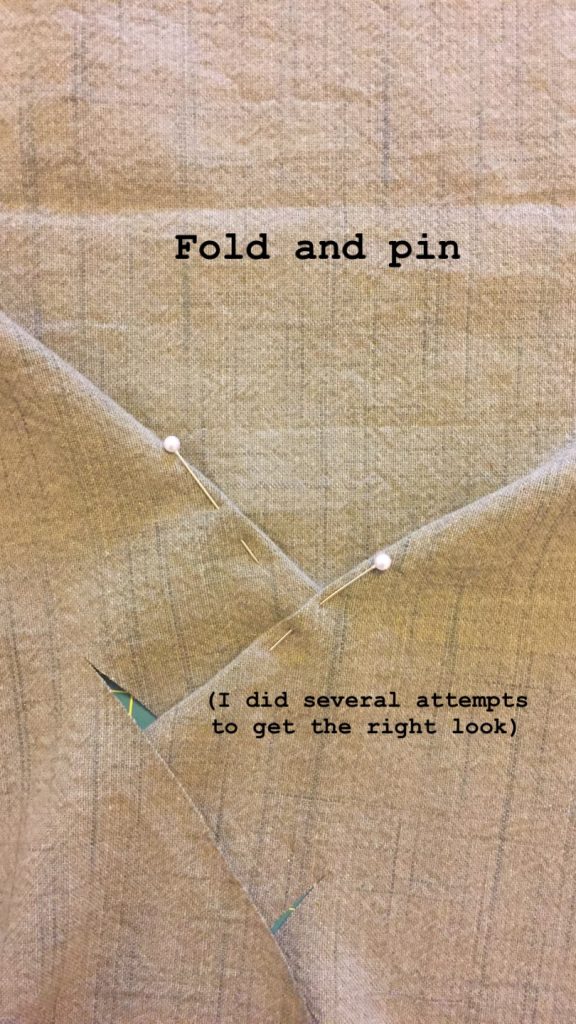
Step 15 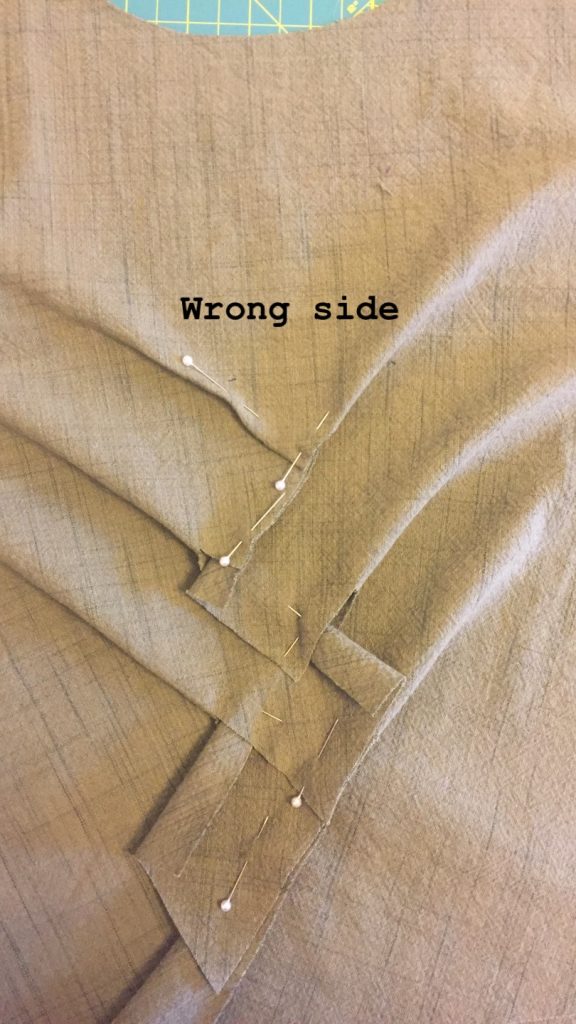
Step 16 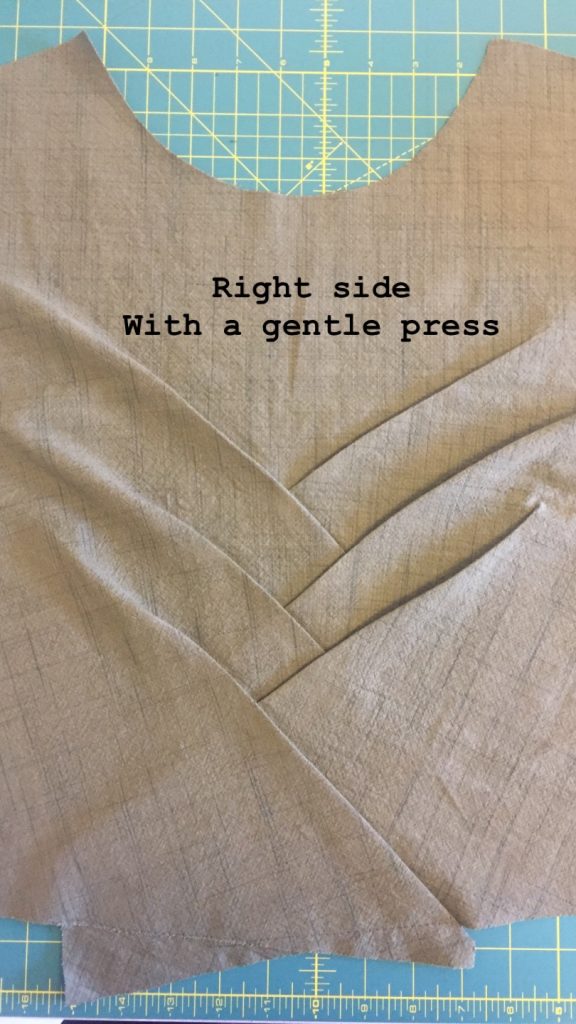
Step 17 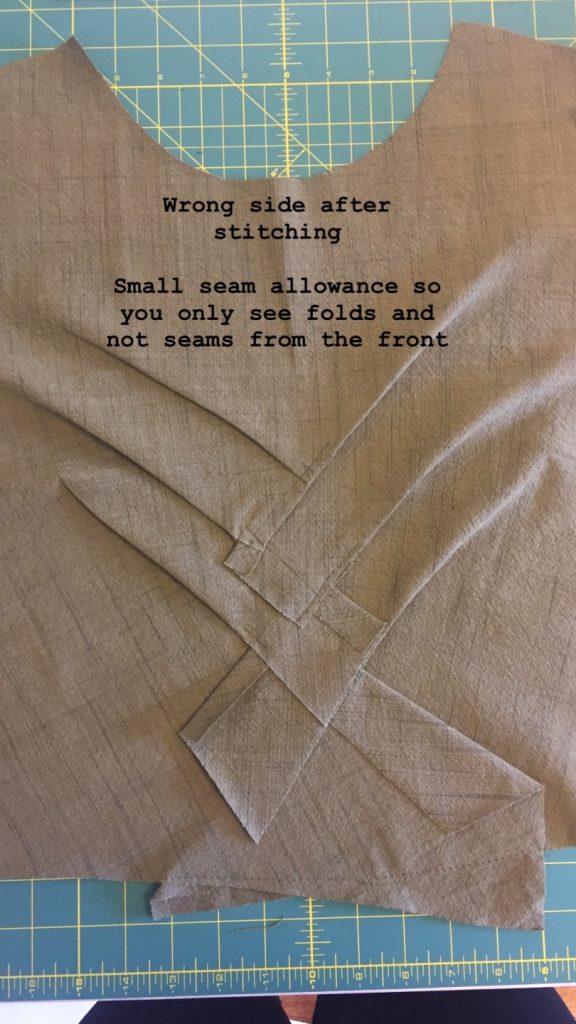
Step 18 
Step 19 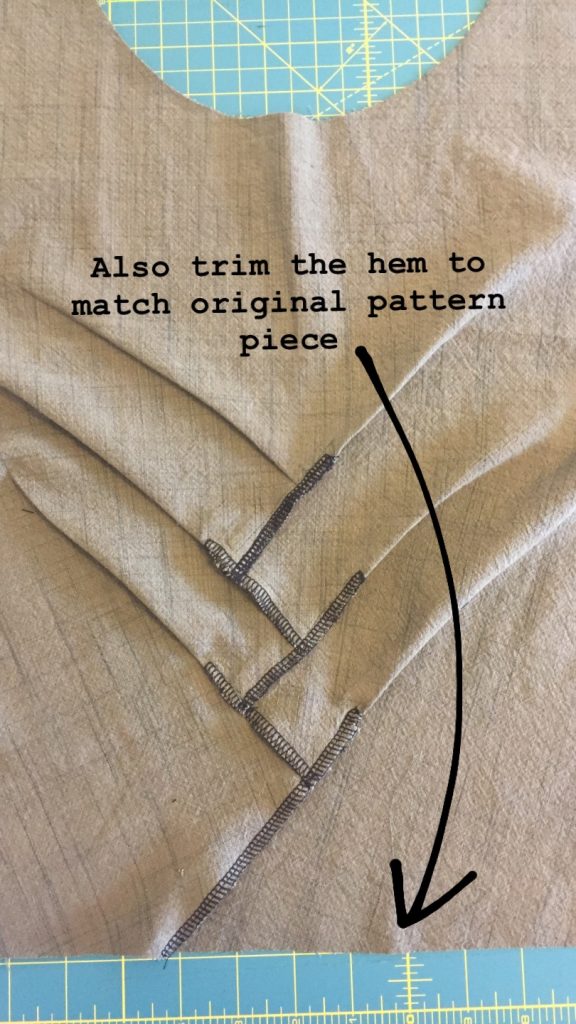
Step 20
- 12: Cut out your front pattern piece that you traced, including the bamboo pattern cut marks.
- 13: Cut out your fabric. Here you can see how I laid out the modified front bodice alongside the other Inari Tee pieces. Cut out the back bodice using the original pattern piece.
- 14: Carefully cut your alternating cut lines.
- 15: This is the fun part, the tricky part, and the time-consuming part. I found that folding and pinning was the best way to test out the look I wanted.
- 16: See the photo above to get an idea of what the wrong side of the fabric may look like as you keep working your folds and pins down the front.
- 17: Give your work a gentle press and check out the look from the right side.
- 18: Stitch (perhaps start with basting stitches to test first) short lines along the folds with a small seam allowance so you still have enough room for the fold on the outside. You don’t want to see the actual seam from the right side.
- 19: Once you are happy with your seams, finish the edges with your preferred method. You can see above that I carefully serged the edges.
- 20: Depending on how your folds worked out, your bottom hem may be uneven. Trim this to match the hem length and shape of your original Inari Tee front bodice piece.
Finish Your Top!
That’s it for the front! Now you’re ready to put together the top as directed in the pattern. If you’ve made the Inari Tee before, you’ll find that it’s a quick sew, and if you’re like me, I love for the finish line to arrive quickly, especially after all of that hard work!

I actually prefer to wear this top with higher waisted jeans now!
I’m loving your posts!! I’m just starting a blog as well – well – I’m not quite as far along as you! But I’m having fun with it! I lived in Rochester, Minnesota for 22 years but moved to the milder climes of Boise, Idaho about 4 1/2 years ago. I also love quilting and garment sewing and have two dogs. I look forward to seeing more from your blog and Instagram!! Keep up the good work!!
Kim
Every winter (now) I wonder why I haven’t moved to a warmer climate like you, ha! I will be definitely checking out your blog as well. Sounds like we have a bunch in common! Thanks, Kim!
That’s a great hack, I think I ‘m going to try and find this book. I love your thorough articles, keep up the good work 😉!
Thank you so much! I initially found this book at my local library, and then ended up buying it. I hope you can find it!
Congratulations for/to(? Sorry, I’m not a native speaker) your new blog. I’ve already added it to my blog reader app.
I wanted to comment your great Jenny hack post, unfortunately I didn’t found the comment area in the article.
Thanks for the Jenny tutorial- this is great and I will definitely try it once I have the pattern.
Regards Muriel
Thank you so much, Muriel! I am looking into why comments aren’t showing on the Jenny hack tutorial post. From my end I’ve enabled comments everywhere but they aren’t showing up for me either! Looks like it’s been an issue with others so I’ll be opening a ticket with the theme provider. Thank you so much!!!
What a great idea for an Inari. I’m working on this design in a dress with darts and the 3D shape darts give is so annoying to fold down, would be easier with a dartless top like the Inari heh.
I wanted to point out about step 8, you shouldn’t remove from the armhole. When you’ve folded your bamboo design and sewn in place the armhole is mostly back to its original shape.
That’s a really good point about the arm hole- thank you! I may have considered leaving it alone while I was in the middle of the whole process, but I went with my gut decision and didn’t want to deceive anyone on what my actual steps were. I’d probably leave the armhole alone if I do it again. I was lucky that it still worked out this way in the end!
Thank you for this detailed description to create this intricate design! It looks so simple, but it quite complicated. Just like the designs by Vionnet. Most pattern magic patterns I can manage, this one faild twice and today it worked.