
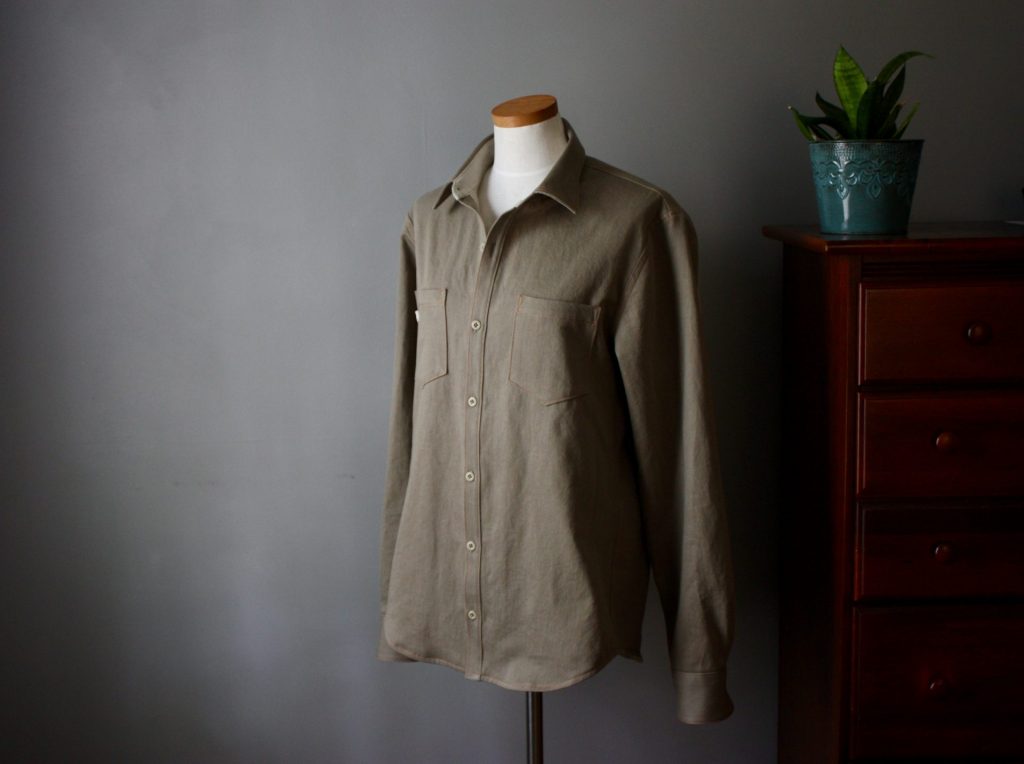
The trusty McCall’s M6044 – it’s a mens button down collared shirt pattern that can be made with short sleeves or long, pockets, yokes, just an overall great pattern. I’ve made this pattern several times for Nick already. This one is my best version yet, not only because my sewing skills are improving, but also because I’ve added some nice custom touches to this shirt that make it unique, well-made, and special. Best anniversary gift yet! I’m sharing 5 ways you can add custom details to your own shirts (not just for men!) to make it one-of-a-kind.
The Details
- Pattern is McCall’s Pattern Company M6044 (I purchased from Amazon for around $8)
- View E, omitting the pocket flaps and front yoke
- I sewed a size L (42-44) with a slightly slimmer body and added 2″ to the sleeves.
- Nick is 6’4″, chest 42″, waist 36″
- I did a 1/4″ sloped shoulder adjustment.
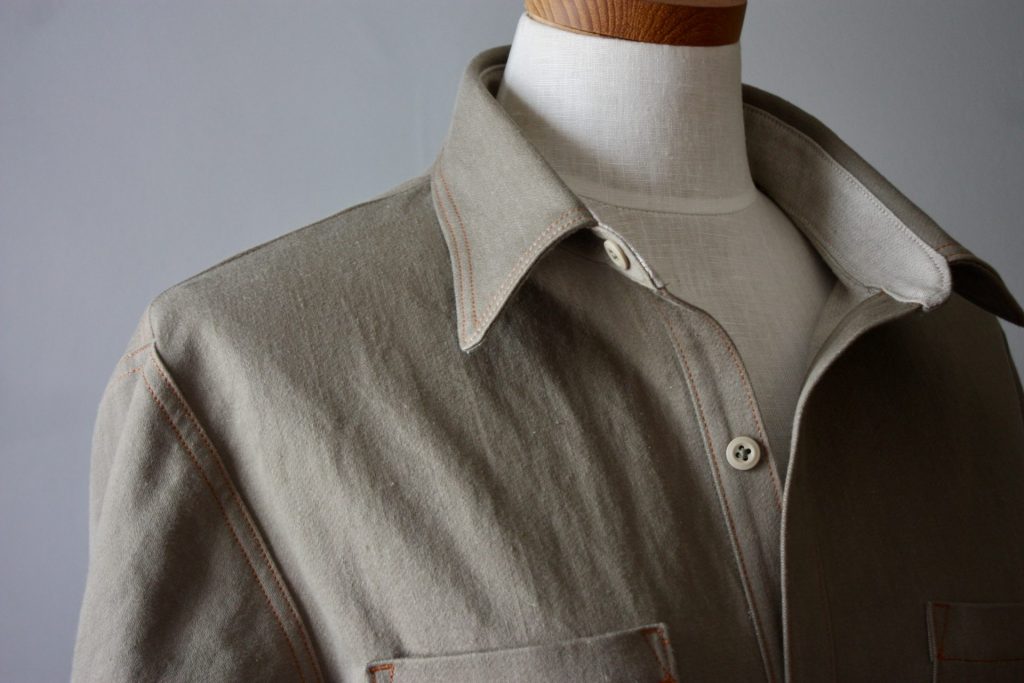
- Fabric is a cotton (twill?) remnant from my local outlet (SR Harris). The right side is a grayish green and the wrong side is a pale gray-green.
- Top stitching Gutermann thread in Levi’s Gold.

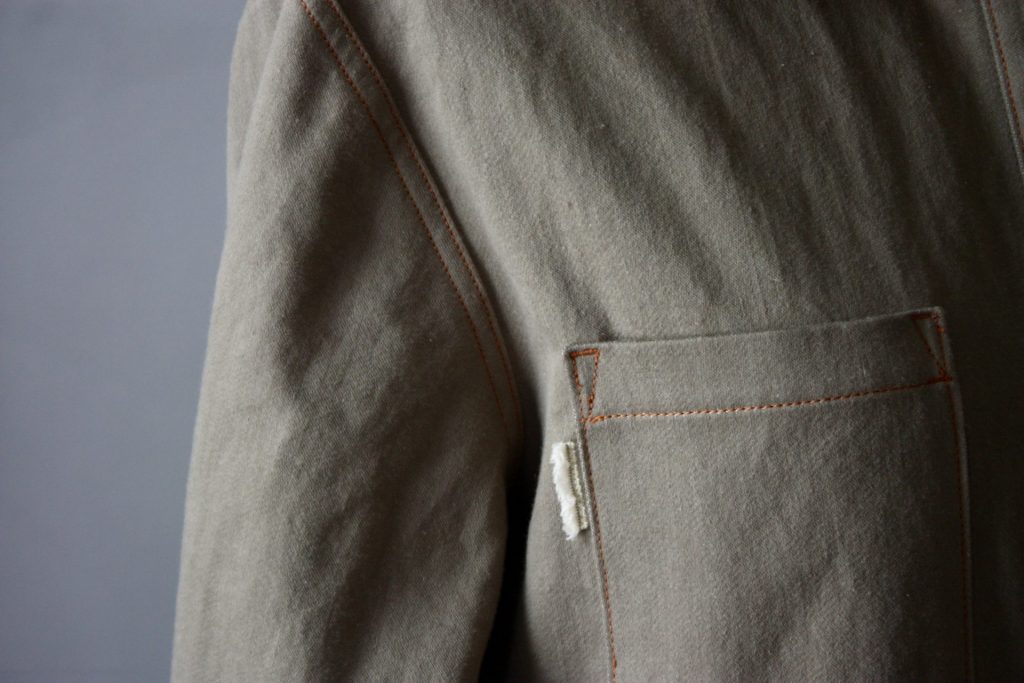
Custom Detail #1: Selvedge Tag + Pocket Top Stitching
I thought the selvedge edge of this cotton remnant was fun enough to include on the front pocket. You know the iconic red tag on Levi’s shirts, right? I used that same idea to fold a little strip of selvedge fringe along the outer edge of one of the front pockets. I simply tucked it under the pocket as I top stitched the pocket down, and then I added one more small line of stitching just to the inside of the fringe so it wouldn’t flap around too much. This would look so cool with a scrap of denim selvedge too.
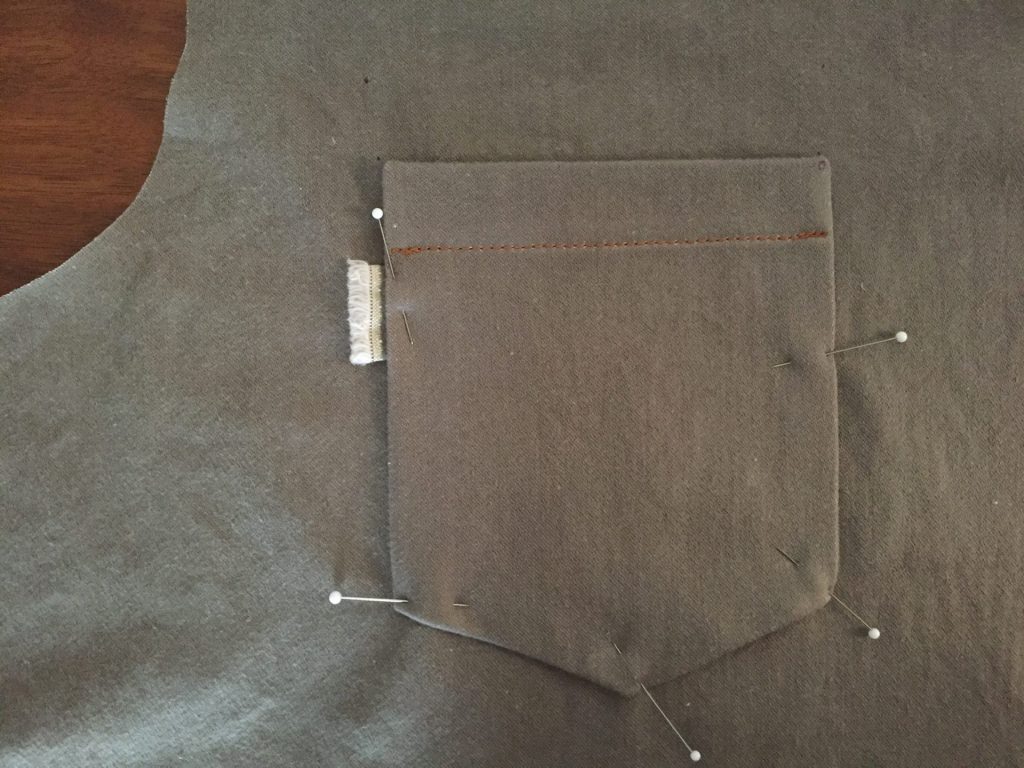
Also, the M6044 doesn’t call for any fancy top stitching on the pocket, but I added some reinforced pocket opening edges. You can see the narrow triangles below, with a small bar tack at the top edge. A bar tack is simply a zig zag stitch with a very short stitch length. I love a good bar tack in contrast top stitching thread. I made the View E pocket flaps for this shirt, but I had a hunch that Nick wouldn’t want them. When I gave him this shirt (it was an anniversary gift), he liked it without the flaps. I was right!
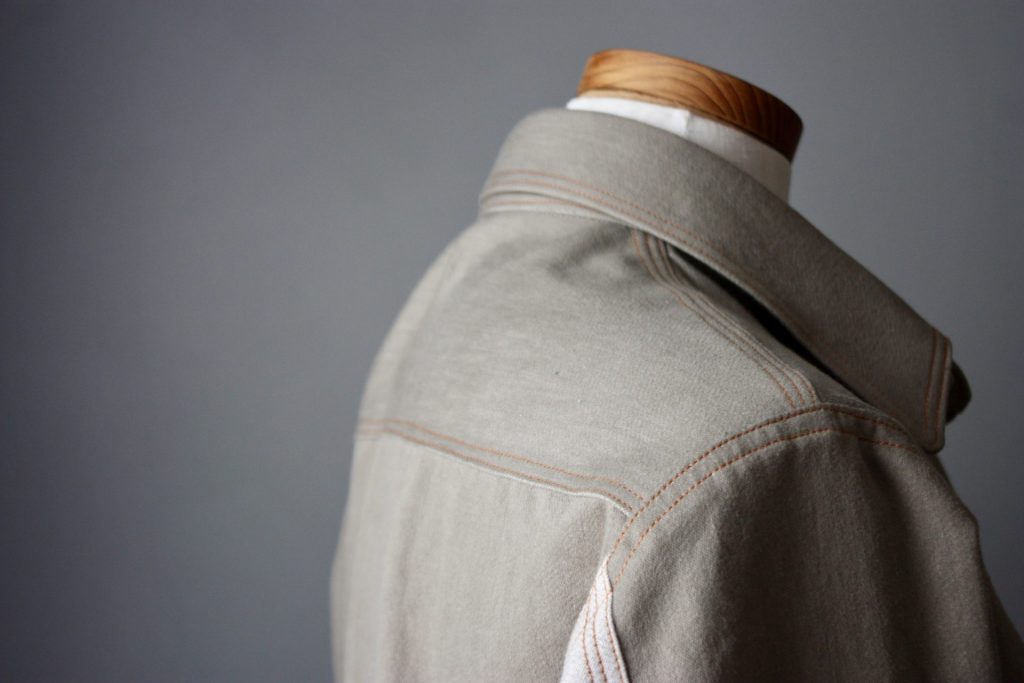
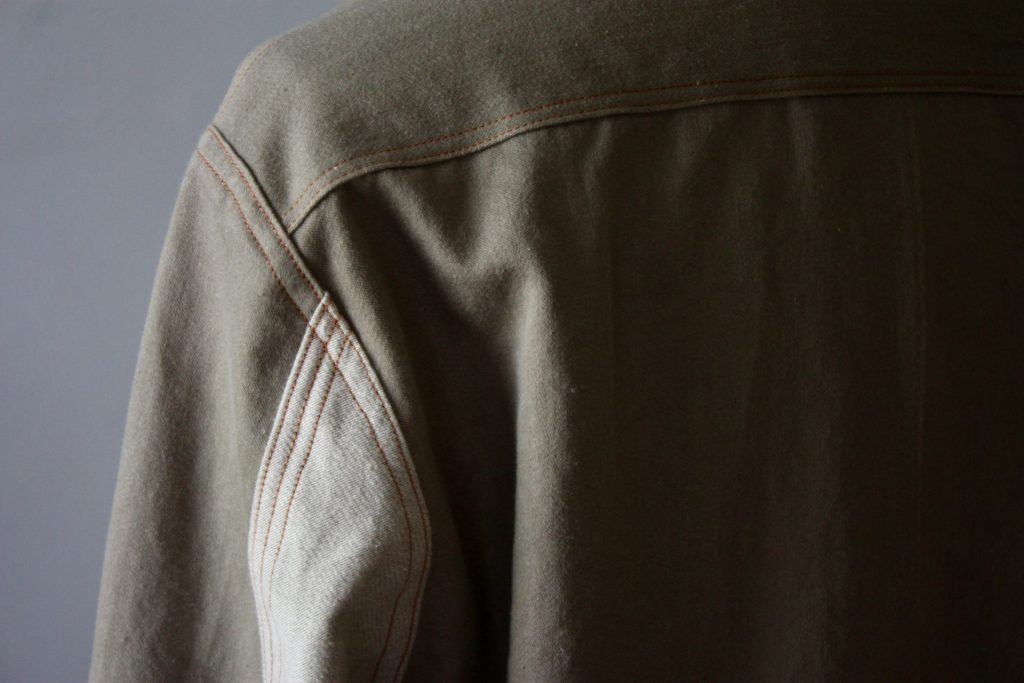
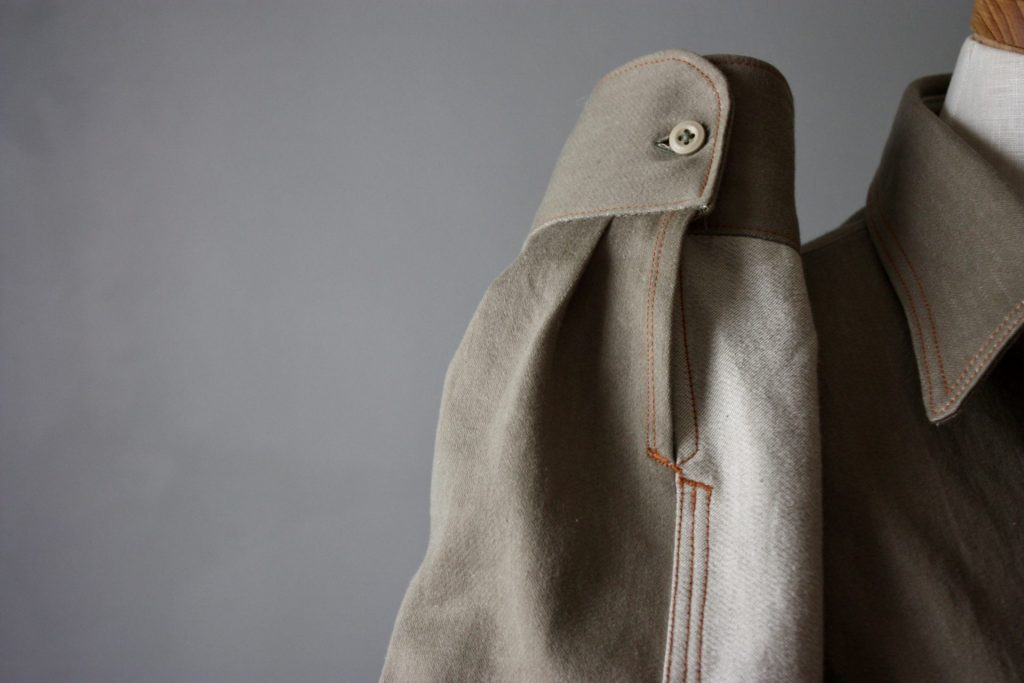
Custom Detail #2: Yoke Shape + Triple Top Stitch
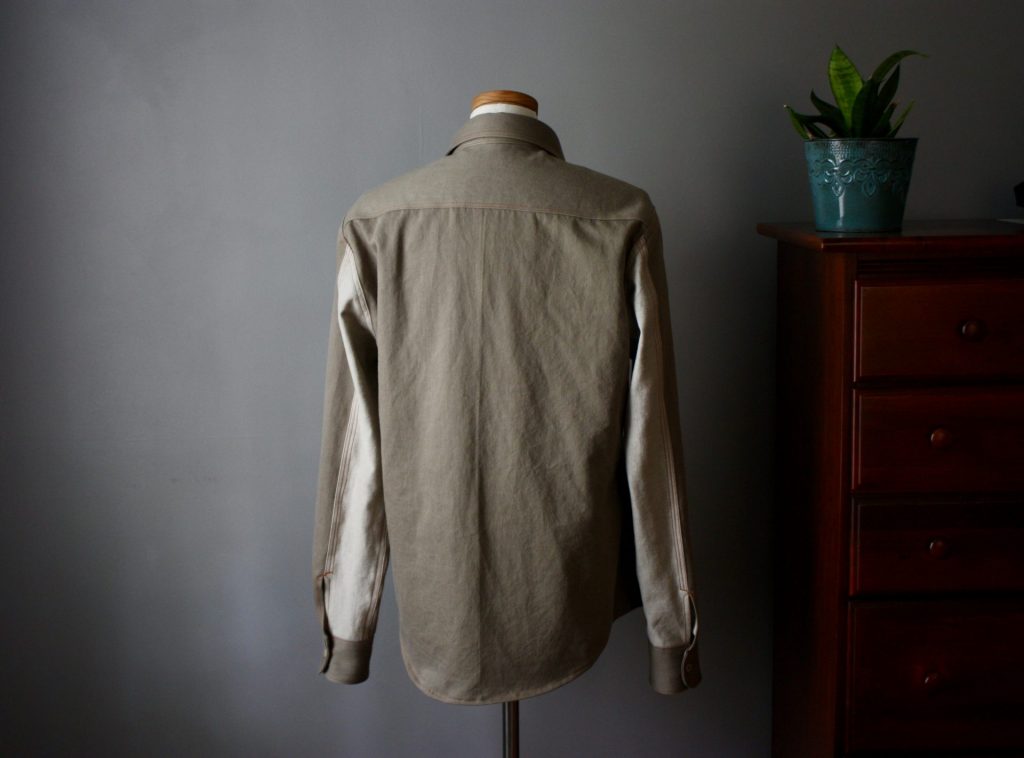
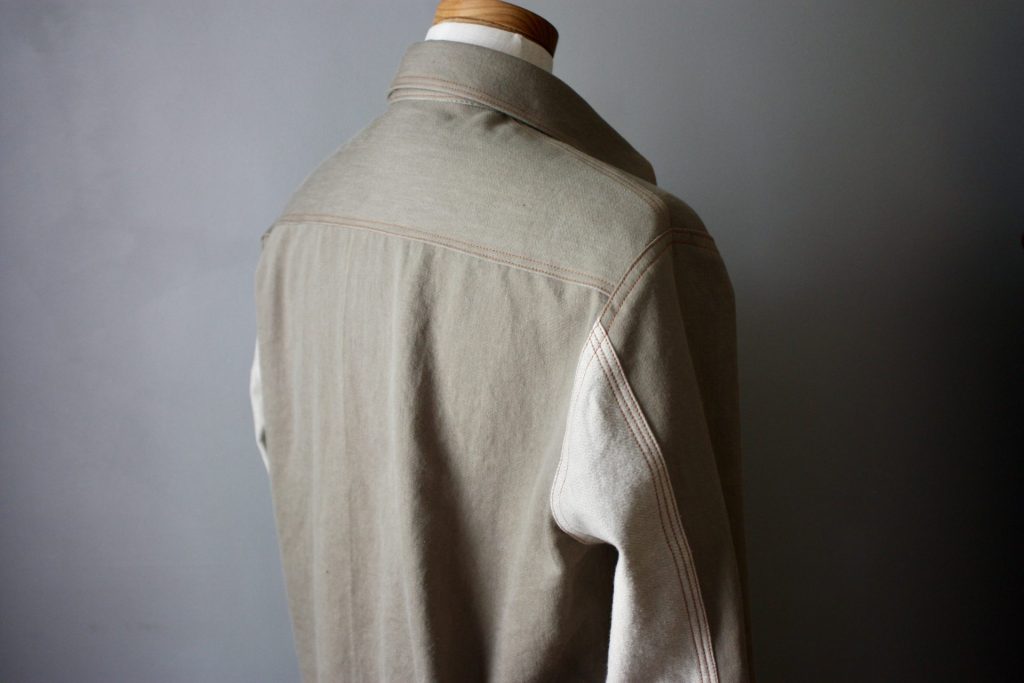
View E offers both front and back yoke, but it’s what I’d call a “Western-style” yoke, the kind that comes to a curved V in the middle. I decided I really liked the look of a clean straight back yoke, and no front yoke. So I simply folded the curved V part of the pattern piece up to make a straight line.
I really love the triple top stitch I did at the shoulders. Nick said when he wore this shirt to work, one of his colleagues noticed that detail right away. I also did a triple line of top stitching on the sleeve, which brings me to my next custom detail!
Custom Detail #3: Contrast Sleeve
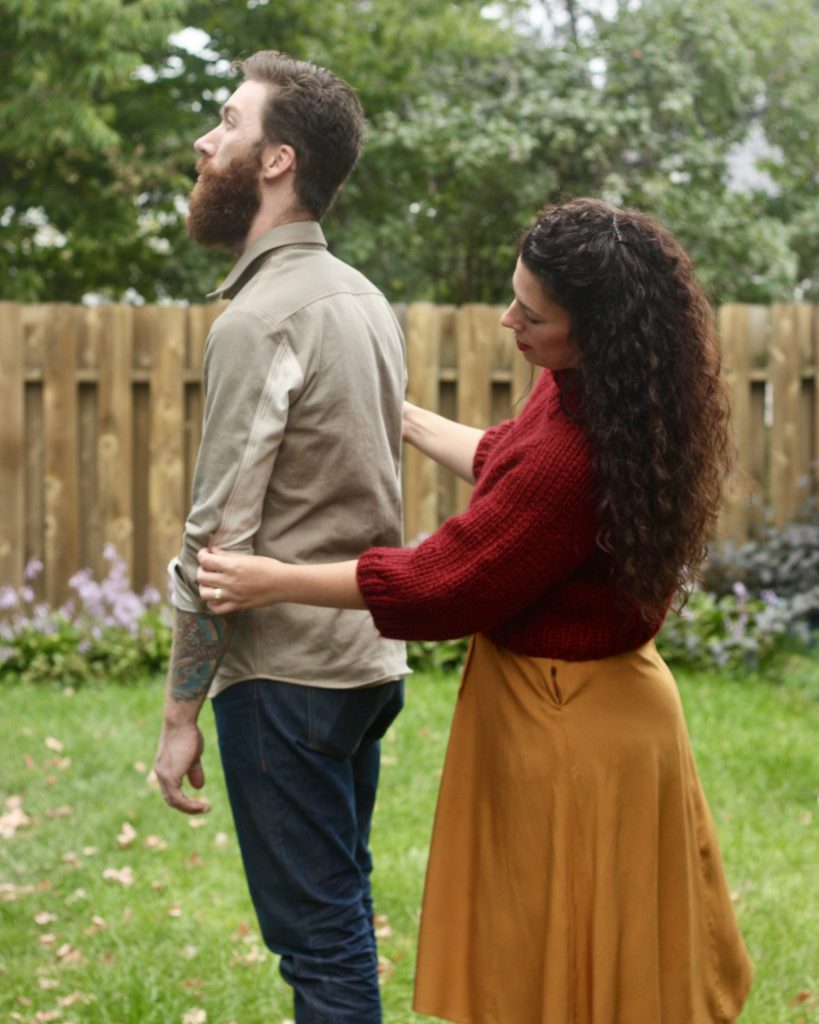
This is my favorite feature of this shirt! The M6044 pattern’s long sleeve is drafted in two pieces. When I was looking at the sleeves on my cutting table, I really liked the look of the wrong side of the fabric next to the right side. It felt like a risky move without asking Nick’s input (as this was a surprise gift), but I am so happy with how it turned out. I haven’t really seen this look in RTW shirts, and I think it’s just the coolest. I wouldn’t do it with a wildly contrasting fabric, but this tonal combo is great. You can see I repeated my triple top stitch on the seam where the two sleeve pieces meet.
Also! When he rolls his sleeves up, which he often does, this ends up with a cool color blocked effect because it’s simply the right and wrong sides of the fabric playing together.
Custom Detail #4: Flat Felled Seams and Bonus Top Stitching
I incorporated the real deal flat felled seams along with faux flat felled seams on his shirt. The real deal is my favorite, but it’s really tricky to pull off around the armscye. It’s also tough to do once your sleeve is assembled because you’d be sewing a delicately pressed and folded seam allowance through the limited space of the sleeve tube. I’ve done it once, and decided it’s a corner I’m ok with cutting.
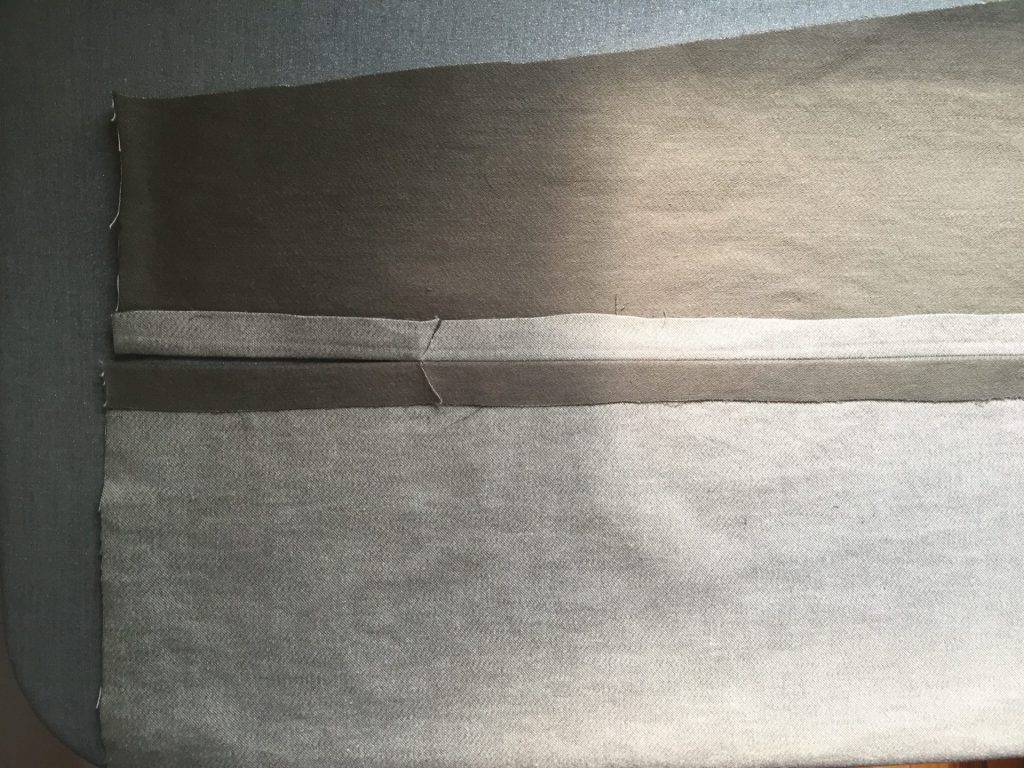
Here’s how I did the real-deal flat felled seams on the seam that combines the two sleeve pieces. It’s a great option since the sleeve is still in the flat stage, and I’ll show you how I switch from a flat felled sleeve to the slit at the end where the cuff will be.
How to Flat Fell a Sleeve
1 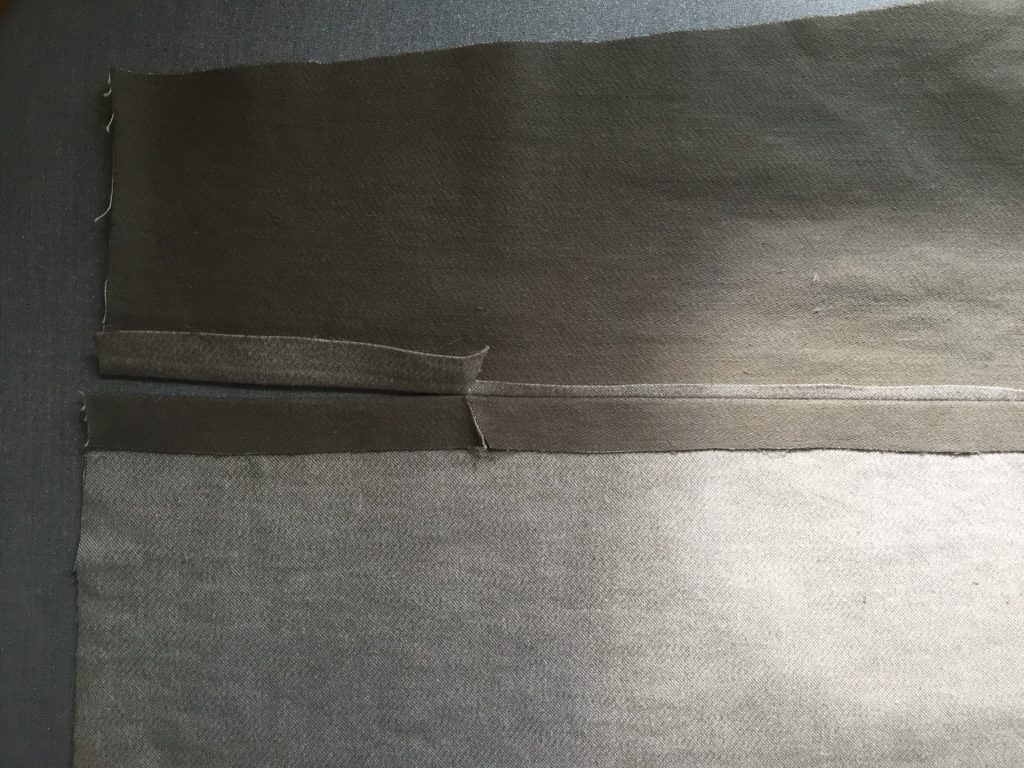
2 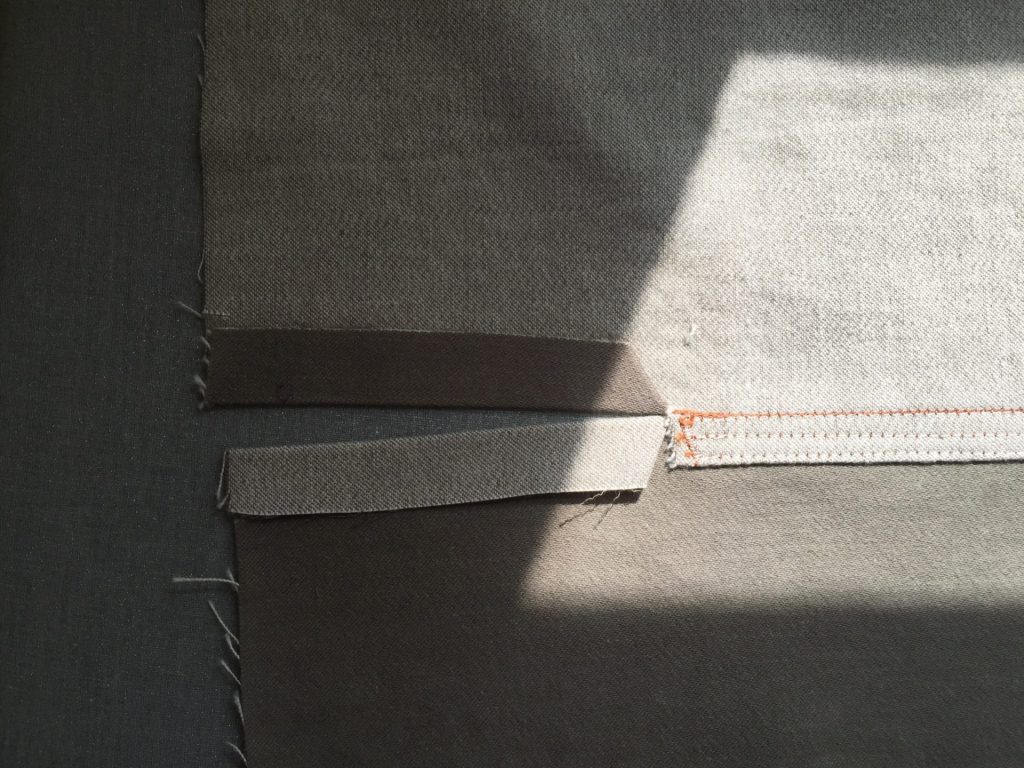
3
- Firstly, notice how I’ve got opposite colors going on since I went for a contrast sleeve. I sewed the large sleeve piece (bottom) with the small sleeve piece (top) at the normal 5/8″ seam allowance and pressed open. Then I snipped the seam allowance at an angle just to the dot mark at the slit (reference the pattern).
- I trimmed the seam allowance pressed toward the small sleeve piece (top) and stopped at the snip/dot mark. Not pictured: I folded the bottom sleeve allowance up 1/4″ and pressed. Then I pressed the seam allowance completely towards the small sleeve piece. I left the slit area alone here.
- I top stitched from the right side of the garment catching the folded seam allowance underneath. Then, I repeated twice more for the triple top stitched look. From the wrong side, I folded the slit seam allowance raw edges under about 1/4″ all around, and top stitched from the front. Pictured is the opposite sleeve since I forgot to snap a photo!
- I decided to add some bar tacks not only for a neat geometric shape, but also to help enforce the area. This slit takes some stress when he unbuttons the cuffs and rolls up his sleeves.
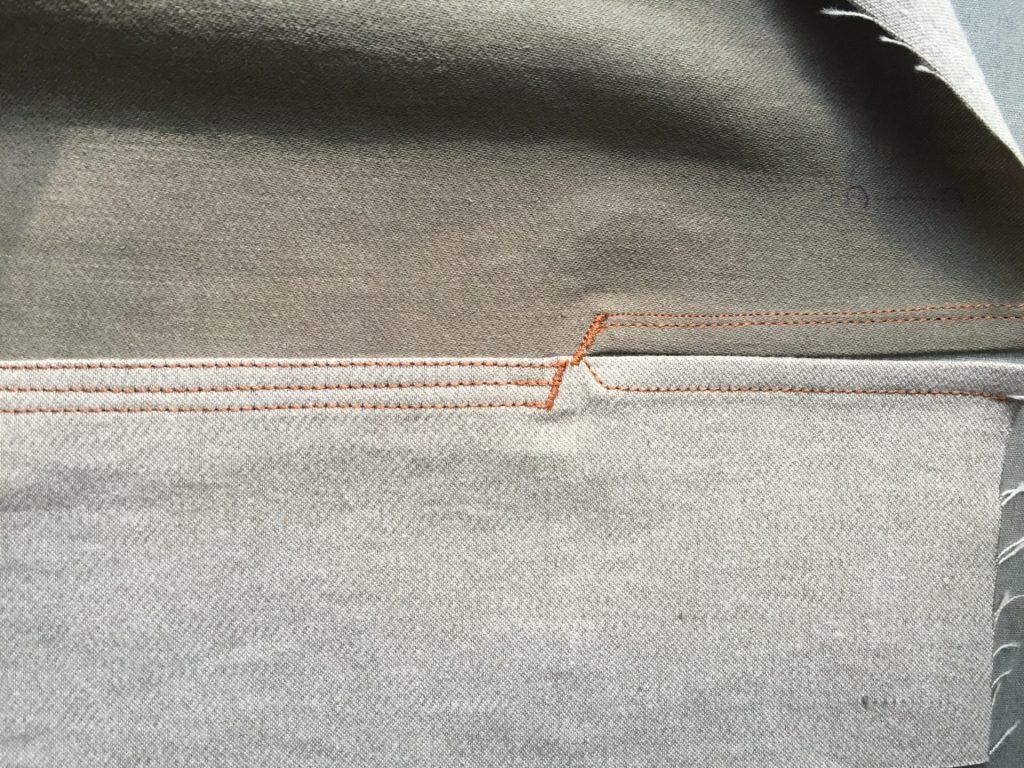
Here’s a look at the finished and buttoned sleeve and cuff:
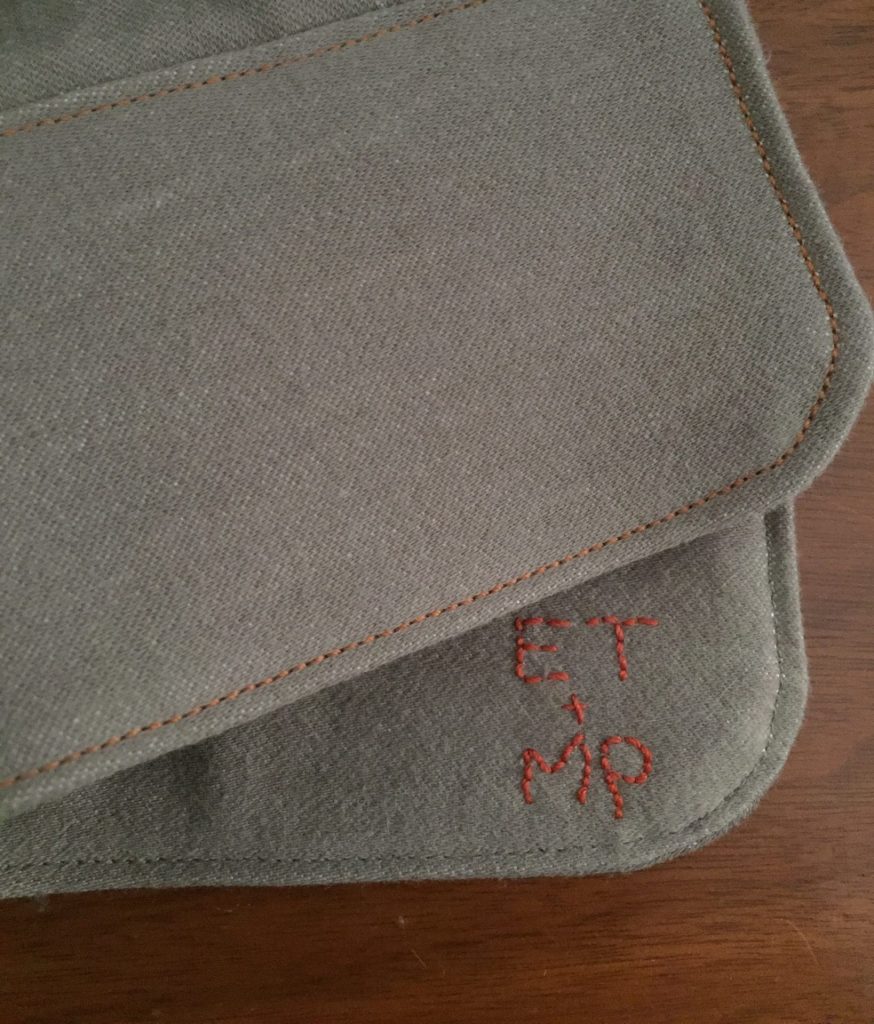
Custom Detail #5: Embroidered Secret Love Note
I mentioned this was an anniversary gift, right? Well I was finishing this up in true last-minute-fashion, the day of our actual anniversary. We had a dinner date planned so I wanted to give it to him after work so he could wear it that night. I was focused on just finishing the thing! I stepped out of my sewing space that morning to find a bouquet of flowers and a fancy coffee as a sweet surprise. So I decided to slow down and add my own sweet surprise to his shirt. I hand embroidered a little ‘his and hers’ initials on the inside of one cuff, and a little heart on the other.
This won’t show on the outside, since I embroidered it before sewing up the cuffs. I also interfaced a small area where I sewed, staying far enough away from the edge and where the button / buttonhole would go. Since he always flips his cuffs up at least twice when he rolls up his shirt, this won’t be visible and is truly a hidden gem.
Final Thoughts
He loves it! I love it! I loved making it. The M6044 is a tried and true pattern for me, and I love finding new ways of customizing the pattern to make it perfectly unique. He reported back on all the compliments when we wore it to work the following day, and I’m also happy to hear he turned down requests for me to make custom shirts for his colleagues. Ha! It was a lot of time and work and if I priced my time accordingly, there might be some sticker shock. That’s a whole different topic of conversation though. Overall, yes to this M6044 pattern, and big yes to sewing as a labor of love.
P.S. I made his jeans in the photo above too! I used the popular Morgan Jeans Pattern from Closet Case. If you’re interested in that project, read about it here!
Love it!! I’m feeling so inspired!!
Awesome, I’m so glad! Thank you for reading!
Beautiful shirt, wonderful bespoke details!
Thank you, Barb!
It’s a lovely shirt and that fabric looks so beautiful to touch. Also, you flat-fell your armscye seams towards the sleeve?! I am REELING. It has literally never occurred to me to do that. Is it easier to stitch than pressing it towards the body?
Thank you! For the flat fell on the armscye – I’ve done it both ways, and I don’t really have a preference over which one is easier. To be fair, it’s not a true flat fell on the armscye. I serged the seam allowances together and then top stitched from the right side. I have done a shirt with 100% flat fell seams everywhere, and it’s not worth the extra headache for me. I’ve done too much unpicking in the past, ha!